Ever wondered how big brands like Dell, HP, Acer, LG, Samsung, or HCL have their logo and manufacturer details displayed in a computer’s System Properties window? Here’s the secret: they add something called OEM (Original Equipment Manufacturer) information to Windows.
The good news is that you can also do the same by adding your own name, brand, and logo to your computer. Whether you want to add your own name, or personal branding, or for your small business branding, customizing OEM info is easier than you think.
This guide will walk you through the process step-by-step and does not require any advanced technical skills.
Note for Windows XP Users: If you’re still using Windows XP, check out our previous article on Branding System in Windows XP.
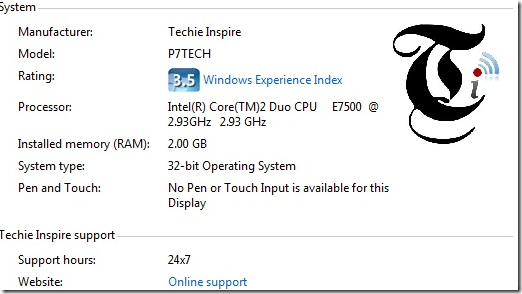
What it looks like:
In System Properties, you’ll see:
- Your logo on the right-hand side
- Details like Manufacturer, Model, and Support Information are on the left-hand side.
As you can see, the Techie Inspire image Logo is on the right side of the system properties, and other information is on the left.

Step-by-step to Customize OEM info in Windows 7 and Vista
1. Open the Registry Editor
Click on Start -> In the Search box, type regedit and press Enter.
2. Navigate to the OEM Information Key
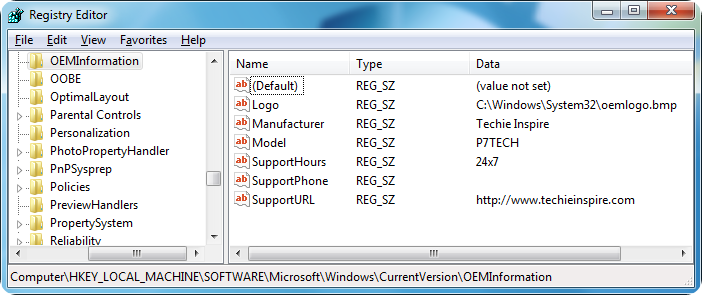
In Registry Editor, navigate to the following location:
HKEY_LOCAL_MACHINE\SOFTWARE\Microsoft\Windows\CurrentVersion\OEMInformationTip: If the OEMInformation key doesn’t exist in Registry Editor, then download this pre-configured registry file. Edit the file in Notepad and then double-click to add it to your system. This will save you from manually creating entries in Registry Editor.
3. Add or Modify OEM Information
Once you find the OEMInformation key in Registry Editor, you can add or edit the following values:
- Manufacturer – Your name or brand name
- Model – Your PC model or a custom name
- SupportHours – Your support hours or any text you like
- SupportPhone – A phone number (optional)
- SupportURL – Your website or blog link
- Logo – The file path to your custom logo
By default, it will look for the logo in the path below.
C:\Windows\System32\oemlogo.bmp- Create a BMP image (120×120 pixels max)
- Name it oemlogo.bmp
- Save it to *C:\Windows\System32*
Note: You can also store the logo in another directory, but make sure you update the same file path in the registry.
5. Verify Your Changes
Press Windows Key + Pause/Break or right-click Computer -> Properties to see your customized branding in action.
Prefer a Simple Tool Instead?
If you don’t want to edit the registry manually, you can use the free utilities.
Download Windows-7-OEM-Editor
Customizing OEM info in Windows 7 and Vista is a simple yet powerful way to personalize your PC. The next time a friend, family member, or colleague opens your System Properties and sees your name and logo, they’ll probably be surprised and impressed!


That’s pretty exciting news and I really hope more people get to read this.
A bit surprised it seems to simple and yet usfeul.
You have really interesting blog, keep up posting such informative posts!
Wonderful items from you, man. I’ve be aware your stuff previous to and you are simply extremely great. I really like what you have acquired right here, certainly like what you’re stating and the way by which you assert it. You make it enjoyable and you continue to care for to stay it sensible. I can not wait to read much more from you. This is actually a great site.
Terrific article. I stumbled upon your blog site and planned to say that I have got truly appreciated looking your blog discussions. In any event I am registering to ones give and I hope you generate for a second time in the near future!
I don?t even know the way I ended up right here, but I assumed this put up was once great. I don’t realize who you might be but certainly you’re going to a famous blogger in the event you are not already 😉 Cheers!
Thx for this great information that you are sharing with us!!!
Great post I must say. Simple but yet interesting. Wonderful work!
I usually visit brand new blog day-to-day and i uncovered yuor web blog.No