To connect AirPods to Windows Laptop or Computer is not as quick and straightforward as you may see it on any Apple device. In fact, AirPods are designed to work seamlessly with iPhones and all other Apple devices.
Since all Apple devices are part of the Apple ecosystem, the devices are integrated seamlessly. Therefore, you may have observed that AirPods get connected to iPhones and other Apple devices in a matter of seconds.
However, nothing stops you from connecting AirPods to your Windows laptop or PC. To connect AirPods to Windows Laptop or Computer is relatively simple but does require a few steps. Just like any other Bluetooth device, AirPods can also be connected to a wide range of Bluetooth devices, including Android Phones.
How to Connect AirPods to a Windows 10 Laptop or PC:
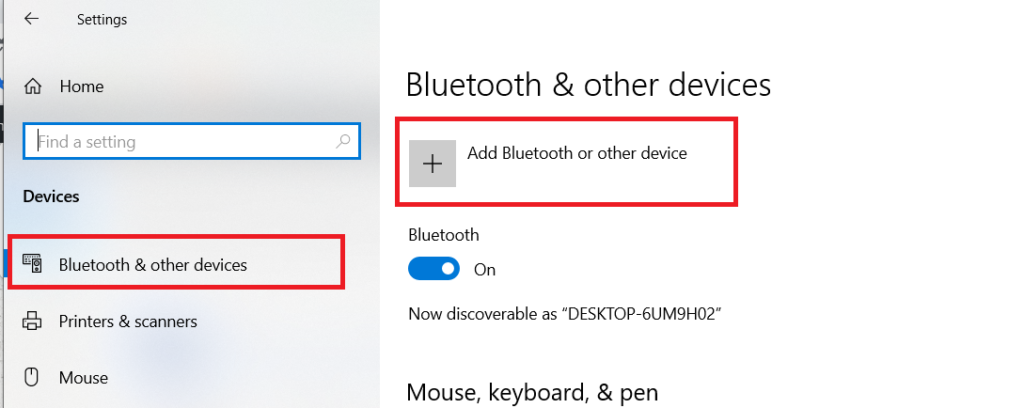
1. Go to Setting Page (Press Windows + I Key Simultaneously)

2. Navigate to Bluetooth & other devices and Click on “Add Bluetooth or other device”

3. Click on “Bluetooth” on Add a device popup screen.

4. Open the lid of your AirPods case and long-press the setup button at the back of the case until you see white light flashing. This flashlight indicates that your AirPods are ready to be paired.
Note: All new AirPods Pro models will have a flashlight in front of the case, wherein for older models, it will be inside the case.

4. You should be able to see your AirPods in the list. Select your AirPods from the list and Connect.

How to Connect AirPods to Windows 11 Laptop or PC:
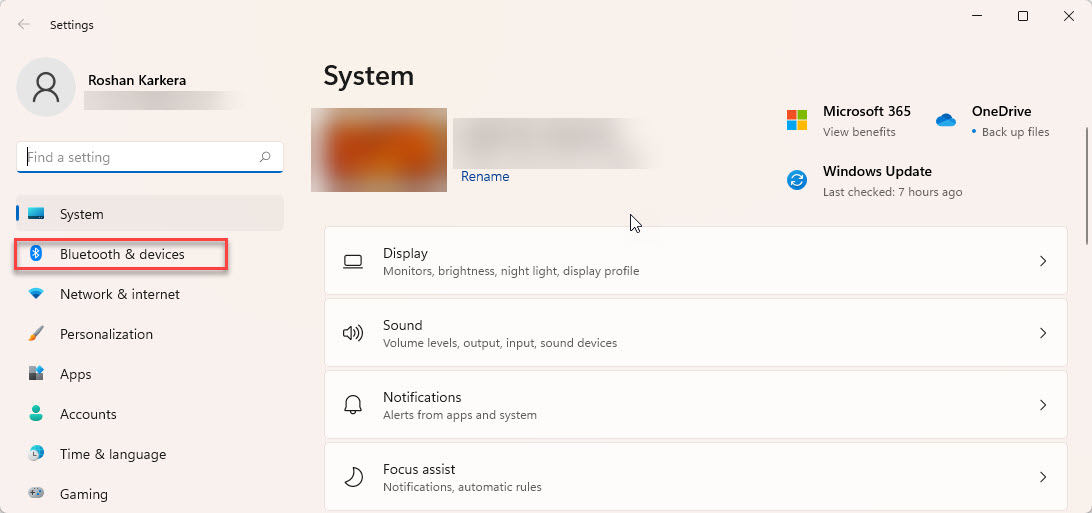
For Windows 11, the steps remain the same as mentioned in the above steps for Windows 10. Due to the Windows setting screen and appearance change, we have covered the below steps if you are on a Windows 11 system.
- Go to Setting Page (Press Windows + I Key Simultaneously)

- Click on Bluetooth & devices on the left sidebar and click on “Add device.”

- Click on the “Bluetooth” option.

- Set your AirPods for pairing mode. Open the AirPods lid and long-press the setup button at the back of the case until you see white light flashing. This flashlight indicates that your AirPods are ready to be paired.
Note: All new AirPods Pro models will have a flashlight in front of the case, wherein for older models, it will be inside the case.

- Your AirPods should now be visible in the list. Select your AirPods from the list. Once successfully connected, the system will display a message that your device is ready to go. Click on Done to close the popup window.

How to Disconnect AirPods from Windows :
You may notice that your AirPods may not be connecting to iPhone or other Apple devices if you have connected with Windows. It is typical behaviour of a Bluetooth device that connects only to a single device at a time. If you face difficulty connecting AirPods to iPhone or other Apple devices, you can disconnect the device.
- Go to Bluetooth & devices setting on the Windows Setting page. Click on Devices.
- AirPods should be visible in the list. Now, click on the three-dot menu and click on Disconnect.

However, you may face issues connecting AirPods to Apple devices since AirPods are also connected with Windows. If you don’t want AirPods to communicate with Windows, you can follow the below steps to remove Apple AirPods from windows.
- Go to Bluetooth & devices setting on the Windows Setting page. Click on Devices.
- AirPods should be visible in the list. Now, click on the three-dot menu and click on Remove.

 Techie Inspire – The Technology Blog


