Are you adding an email signature manually whenever you send out a professional email on Outlook? I believe that is the obvious reason because of why you landed up on this article. In this article, we will see how to add a signature in Outlook and Outlook on the web.
If you are sending any professional email, adding an email signature at the end of your email not only tells about you but also your brand, which can boost engagement with you through various platforms.
Gone are the days when we just used to send email signatures containing only our name. Today, we cannot miss the opportunity to create brand awareness and other online platforms that represent you and your brand in your signature.
Therefore spending your time perfecting your email signature is definitely worth the time and can give a lasting impression to your email reader. However, manually adding a professional signature that includes your name, contact detail, your brand image, and other links is not the right approach when sending an email.
Creating a signature in Outlook is easy and can speed up your work of sending the email. It’s one time task where you need to create the signature in Outlook, and the same signature can be inserted in your every email automatically.
How to add signature in Outlook
First, we need to create the signature in Outlook.
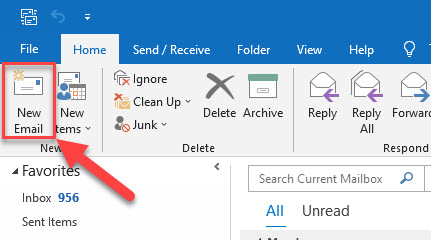
- Open Outlook and click on “New Email” in the ribbon bar to create a new email message.
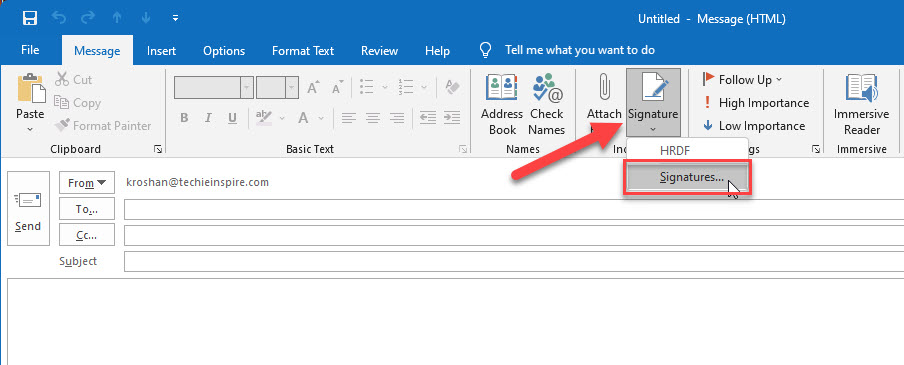
- Click on “Signature.” In the drop-down, click on “Signatures…“.
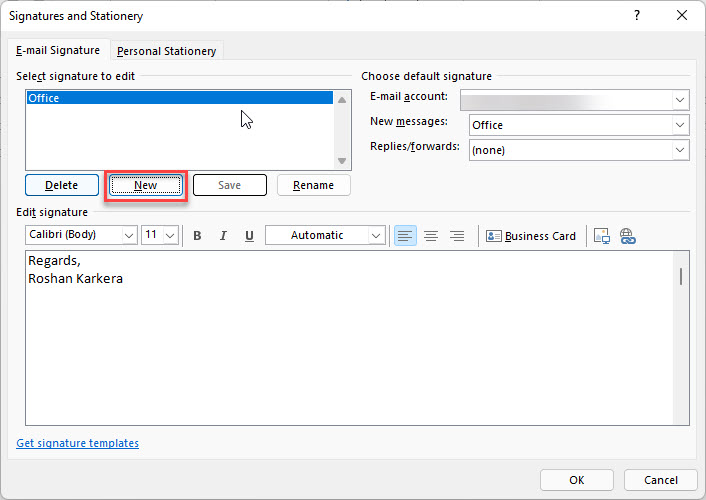
- In the Signatures and Stationary windows, click “New.”
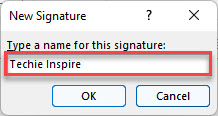
- Type the name of the signature and click “OK“
- Type your signature in the edit signature box. In this box, you can add your name, job title, company, contact details, email address, brand/company image, social media links, or any other information that you want in your signature.

You can also set the default signature that will insert the signature automatically whenever you create a new email.
Under “Choose default signature,” select signature from the drop-down for New messages. Similarly, you can set the default signature for reply/forward emails.

- Click “OK” to save the changes.
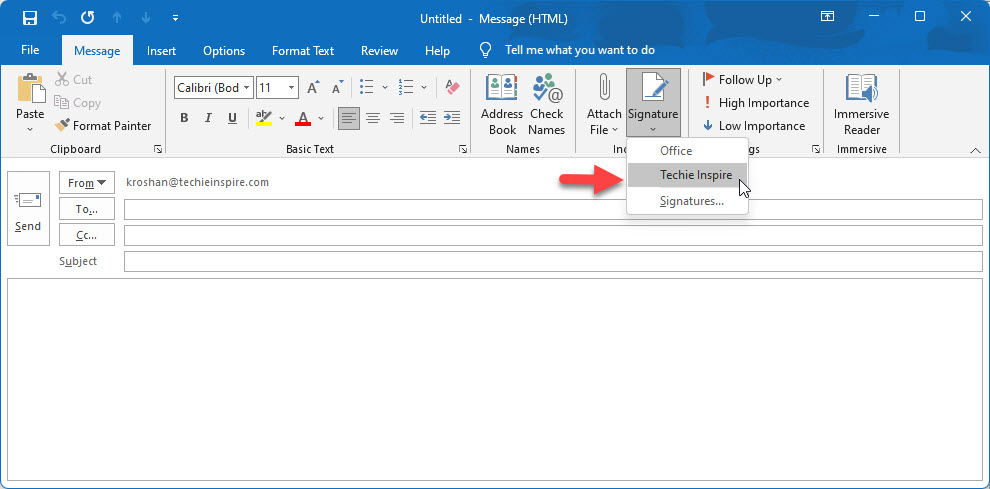
Open New Email, and you will see signature is automatically inserted in your email. If you have not set the default option and manually want to add a signature in Outlook, follow the below steps.
Click on “Signature” on the ribbon bar in your Email window. Choose the signature from the drop-down list that you want to insert.
How to add signature in Outlook on the web
If you are using Outlook on the web, follow the below instruction to add signature in Outlook on the web. There are two versions of Outlook, one is the new version, and another is an older version, also called classic Outlook on the web.
Create Signature in Outlook on the Web
- Login to Outlook on the web. Click on the gear icon in the top-right corner and click on “View All Outlook Settings.“

- Click “Compose and Reply” on the left-side menu. Type your signature in the signature box and click “Save.”

To automatically add signature for all new emails, you can set the default signature for new emails. Under the Select default signatures section, select signature from the drop-down list For New Messages.
Similarly, you can set the default signature to automatically add signature for all forwarded and reply emails. Under the Select default signatures section, select signature from the drop-down list For Replies/Forwards.

Click on New Message, and you will see your signature. If you have not selected the checkbox to add signature automatically, you can also add it manually. Click on the ellipsis icon at the top pane, and from the drop-down menu, select “Insert Signature.“

Create Signature in Classic Outlook on the Web (Older version of Outlook)
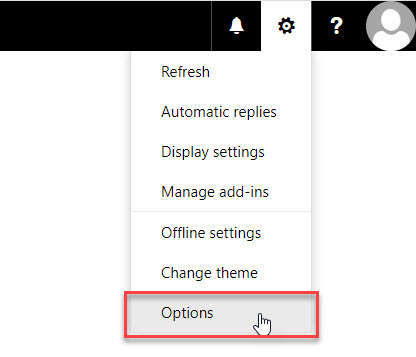
- Login to classic Outlook on the web. Click on the gear icon in the top-right corner and click on “Options.”
- Click “Email Signature” on the left-side menu. Type your signature in the signature box and click “Save.”

You can also select the checkbox “Automatically include my signature on new messages that I compose” to automatically add signature for all new emails.
Similarly, select the checkbox “Automatically include my signature on messages I forward or reply to” for signature to be inserted automatically for all reply and forward emails.
Click on New Message, and you will see your signature. If you have not selected the checkbox to add signature automatically, you can also add it manually. Click on the ellipsis icon at the top pane, and from the drop-down menu, select “Insert Signature.“

Also, check out other articles on Microsoft Outlook.


