When a new hard drive or CD-ROM is added to your PC, Windows automatically assign letter to drives. However, the assignment may not be in proper sequence or may not suit your PC. I have seen this common issue with the drive letter assignment problem When you insert/connect external flash drive, pen drive or external drive to USB, Window may not show any external drives connected to PC. Even though you try to re-insert the Flash or external drive again which most of the time doesn’t help but still there is a message saying that “Ready to use.” This is the most common issue caused due to drive letter assignment. Windows tries to assign letter to the new drive but the letter is already in use by other, may be the drive letter being used by one of the remote computers on the network drive.
However, we can assign drive letter manually to the drives.
Note: We cannot change the drive letter of the windows directory, i.e. The drive where the window is installed.
There is no risk in changing drive letter, but if you have installed any program in the particular drive, then the programs/application icon or shortcuts will not work.
Follow the below simple procedure…
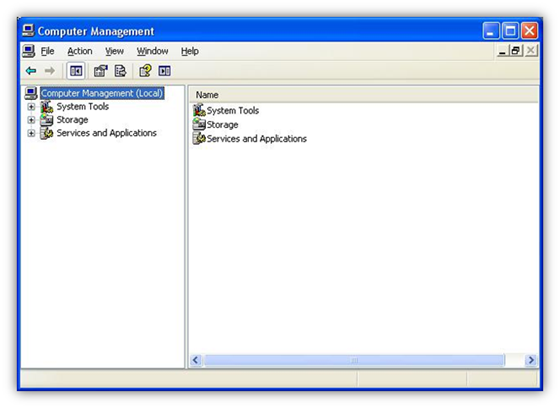
Step 1: Go to Start –> Control Panel –> Administrative Tools –> Computer Management or alternatively you can also Open Run, Press Window Logo + R, Now Type “compmgmt.msc” without quotes and press Enter.
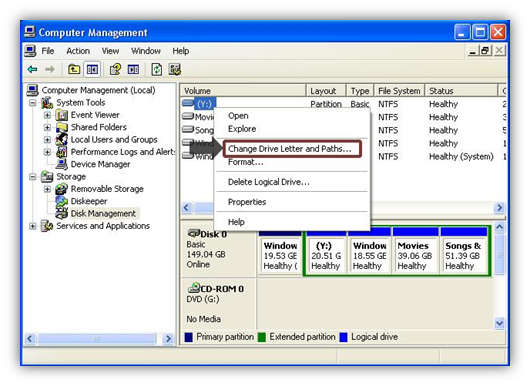
Step 2: Now in Computer Management, Go to Storage –> Disk Management.
Step 3: On right Pane of Disk Management, Select the drive of whom you need to change the drive letter and choose “Change Drive Letter and Paths..”
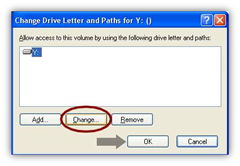
Step 4: Now Click on “Change” and choose a new drive letter from the available drop-down menu and click OK.
Step 5: The Confirm window will appears saying that “Some programs that rely on drive letters might not run correctly. Do you want to continue?”.click on “Yes”
Note: In case of any software installed earlier in the drive, and you change the drive letter for the same drive will result in non functioning of software.
Step 6: There may be one more message box pop up asking yes or no, click on “Yes” .
This trick would really help to keep all drives in sequence and organized also may help to solve USB Detection problem caused due to drive letter assignment issue.
If you found above post interesting, then Subscribe to Techie Inspire.
 Techie Inspire – The Technology Blog


Years of seeing the same drive letters on a daily basis really grow on you, I'm just glad i've stumble upon this tutorial, kudos to you mate cheers
AFAIC that’s the best anwser so far!