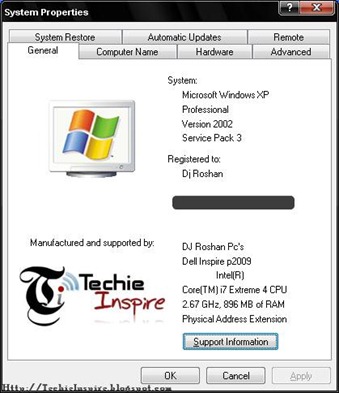
When PCs or Laptops are purchased from brands Like LG, HCL, SAMSUNG, etc., they have their logos and company name on the System Properties.
Branding can be seen on any PC or laptop purchased by a company that comes with a pre-installed Windows Operating System. Some people, in general, don’t like to see their manufacturer logo on their System Properties. Instead, they want their own personalized logo or the logo of another manufacturer to be seen.
In this article, we will see how you can add or change OEM Logo and other details in your System Properties on Windows XP.
Check here if you want to add or change OEM Logo for Windows 7 or Windows 10.

Steps to change details in System Properties Information
Step 1: Open Notepad, copy the below code and paste it into the Notepad, and modify the manufacturer and model names.
Furthermore, modify support information to add more detail if required. Save the file with the filename as OEMINFO.INI
[General]
Manufacturer=Your Name Here
Model=Your Model Here
[Support Information]
Line1=Your Name Here
Line2=Your Address Here
Line3=Your Email Address Here
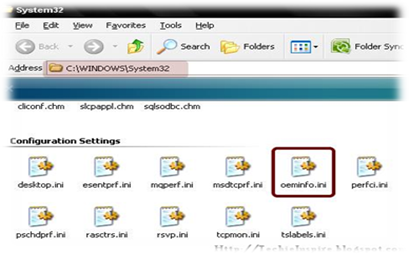
Step 2: Copy the “OEMINFO.INI” file to Windows\System32 Folder directories (where Windows OS is installed).
To open the folder directly, Go to Start –> Run, copy the below line, and paste it to the Run dialog box to open the System32 folder.
%Systemroot%\System32
Step 3: Now, copy and paste the “OEMINFO.INI” file to System 32 folder. Check System properties to view the brand name as you have customized it.
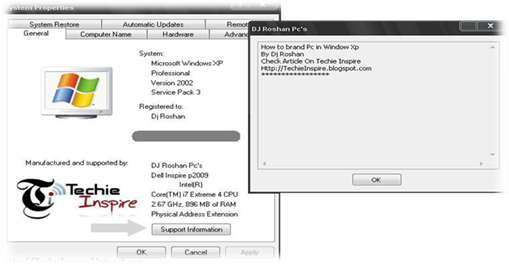
Press the Windows Logo + Pause Break button on the keyboard and check on General Tab at the bottom to check System properties. When you click on the Support Information button, you will see the additional information you added.
If you want to display some more information to Support Information, then simply increase the line to the file.
e.g., Line4=Your mobile Number or anything.
Steps to add or change OEM Logo in System Properties
To add the logo to System Properties, you need to satisfy below three conditions.
- The image file must be saved with the .bmp file extension.
- The image should be named oemlogo.bmp and should be kept in Windows\System32 Folder.
- The images should be about 180 (width) x120 (height) pixels.
Step 1: First, create the image using any photo editor. You can use Paint Brush editor and create an image of 180*120 pixels. Its width or height can be less than 180*120 but cannot be greater than the specified limit.
Step 2: Now, copy the image to the System32 folder. Open the Run dialog box, Go to Start –> Run, and paste the below path into the Run dialog box to open the System32 Folder.
%Systemroot%\System32
Paste the oemlogo.bmp image in the System32 folder. Now, check the Logo on System Properties.
Note: Image will not be shown if OEMINFO.INI is not present in the system32 folder.
Subscribe to Techie Inspire for the latest Tricks, Tips, Guides, and much more
 Techie Inspire – The Technology Blog


Its really a wonderful blog…Very innovative….
It took me 30 minutes to look for oeminfo.ini but to my surprise i do not have this file. Did you know why?
@ Uk Essays
I think you skiped reading some part of the article properly.Well,you don't need to search oeminfo.ini, but you have to add oeminfo.ini in system 32 folder, which i have showed above.
that's amazing i must say DJ roshan you have brought something new and pretty handy
Thanks I will try this on my computer in My retail
store I think its a really cool tip…
Image Logo Not Display In The System Properties
Very innovative,and i really like this blog.so much tricks available here.
Oooh, nice! I already new how to change the description part, but the logo had completely escaped me!
I'll definitely be trying this out, as I have a few logos that I would love to use for such a purpose 😀
This is really cool! I´ll try it in my conputer right away. Thanks for the info.
Thanks, I've wondered how big companies put their logos in these places, obviously not manually like this, but still cool. Thanks 🙂
i like the content of the blog……
Please keep trohnwig these posts up they help tons.
Hi there! thanks for sharing this useful tutorial. i'm gonna do this on my notebook.
I had no idea this was possible. Thanks for sharing. Now I just have to come up with a logo that screams me.
Nice post! This really helps me to find the answers to my question. Hoping that you will continue posting an article having a useful information. Thanks a lot!
Very innovative,and i really like this blog.so much tricks available here.
this article is nice for me.. thnx for sharing
dosya upload
I can’t beeilve I’ve been going for years without knowing that.
you are doing a great job……
I have been an UP eversince until such time when all of my family members went to shopping. I learned by searching and reading about the computer configuration and also as what the author mentioned above "branding your pc with your name and logo"
Thank you very much. I’m going to put this too good use.
Great post, very informative. I think a lot of people will find this very useful.Keep post in coming future as well!!!
I have use similar technique in my on of my app completely replacing sysdm , u can find this in my blog
I lIke this blog, keep blogging bro. Thanks for this information 🙂
I wanted to thank you for this great read!! I definitely enjoyed every little bit of it. I have you bookmarked your site to check out.
Customized Logo
You’re the gaertest! JMHO
Another great post.
Astounding article bro. This kind of is just a exceedingly nicely structured posting, just the tips I was hunting for. Thanks